Monday, June 15, 2015

A Project and HDRI Textures

   So.  Here early on this Monday morning, (the computer was rendering all of last night)  I see the final image of the first stage of a scene I modeled after my grandparent's kitchen.  I am extremely happy with everything so far, and feel this is a project I can continue on and push forward with.


   Did you notice how the back window of our beginnings of a house opens into a subway?  Yeah.  Issue.  The Background is something called an HDRI which is an enormous resolution image that is bent in such a way that the 3d program can instantly form it into a background.  Basically, it's almost a prebuilt scene for you.
   I used this one because it has a wide spectrum of color, that will accurately test the lighting scheme.  You won't see this image like this ever, because I don't like warm color schemes.  Until later.

    Here are the basic fixes I am going to do:


   And that is all I have for now!  Thanks.

Sunday, June 14, 2015

On Hollywood and What We Can Learn


    As a CG Artist, I am constantly taking inspiration and ideas from everywhere.  People have even written books on how to steal ideas from people, such as "How to Steal Like an Artist"  by Austin Kleon.  It is an engaging read; I suggest you read it.  Plenty of fun, otherwise.

    So, I research, and research, and research.  And, eventually, I find some gems like the one I found today.   Basically, I discovered how Hollywood lights their scenes.  Not just for dramatic photos, like the one below, but everything.  The lighting technique is fairly simple to pull off and very effective.  The funny thing is that people won't really notice the difference.

Credit:  Aaron Ziltener
   So I set up a really simple scene for you.  The scene looks like this:


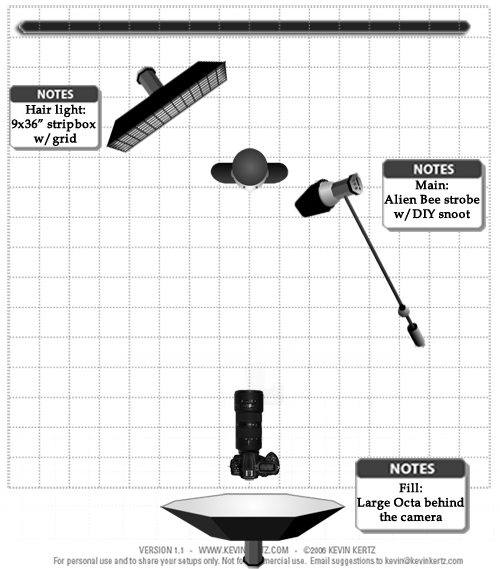
   It is just an extremely typical test scene.  No big deal.  It took about ten minutes to render on my computer, using approximately 20% of the CPU.  (I was rendering another project at the time)  It looks decent, thanks to the Cycles rendering engine, and I was pleased.  Then, I tried the Hollywood lighting which looks a lot like this.


  Ignore all the notes.  The basic idea is that you have three light sources:  The backlight, which is behind the camera, The background lighting, which is behind the subject, and the side light, which gives the profile appearance.  
   You can see all the elements inside the picture.  The side lighting in the profile of the face and the cast shadows to the right, the backlight is lighting the front and you can see details of the body and hands because of it, and the most subtle effect of all, the background light.  You can see it in slight details of the hair, and fuzziness of edges that would otherwise be sharp, such as on the arm.  

  So, I applied these principles to my test scene.  


  Now, you probably don't really notice any difference.  And that is because the difference is very, very subtle.  But, the second picture is a better-lighted scene.  

Let me put them next to each other for you:

   See the difference?

   For more information on lighting, visit http://www.sekonic.com/whatisyourspecialty/photographer/articles/the-five-basic-portrait-lighting-setups.aspx


Wednesday, June 3, 2015

On Inspiration

Inspiration is something that is truly important in art.  The video below is one of the biggest inspirations for me.  Look it up:  It's called "The Third and The Seventh"


It is a truly amazing video.  None of it is actual footage, and all of it is artistic, perfect, and beautiful.

The main reason this appeals to CG artists is that it demonstrates a scene that we live in constantly, (buildings) in a way that inspires emotion and brings you in.  Architectural renders are notoriously easy to make boring, but this movie is undeniably gorgeous.

Watch it all the way through.  I promise it will be worth it.

Well. Look Who's Here

Hello!

 Honestly, I have no words to describe how long it's been.  It seems the more I want to post, the more life decides to rip me away from Blender and CG.  So! Here is a long awaited (by not many people) post about everything going on in my CG world!

But first, this news.

Not much has happened in the space of five months, except for two new versions of Blender.  They have some snazzy features, such as pi menu tools,

which are a neat way of moving around in the Blender UI.  I don't like them much, but they're there and up for use.  Also, Ivy generation has taken a huge leap forward, with preset UV unwrapping and other snazzy stuff, which makes for easy plant creation.  Cycles also has thrown forward huge leaps in speed and render times.  Everything is looking up!

Another big announcement arises in the fact that CG cookie, the tutorial site for Blender and computer art in general, is compacting into one big cookie site.  Prices will rise, and other interesting things will happen.  So, the wonderful tutorials located on there are getting even more wonderful.

Blender guru is also starting a new CG texture site.  Apparently its going to cost something, (of course) but it will have high quality textures with displacement and normal maps included.  I'm excited for this, because I'm tired of making my own textures from the images I have.  Exciting!


Most of my time over the past couple months has been spent working on some skills that I thought were lacking in Blender.  Several highlights:

This is the image for a project I'm doing for the Blender Guru Steampunk Contest.  I'm doing it in 3D and making it do cool stuff, such as fighting huge robots.  It's already almost completely modeled and it is doing great. Images will be neat.

Another project I am doing on Blender Cookie.  He is already complete, fully, done. Yay!  I also 3D printed him on our school's printer, and he looks wonderful.  I would include a picture, but I'm lazy to go find a camera.

Another momentous occasion arises by the fact that I am taking two classes next year: Radio 2, and Digital Media that will give me at least 2 hours every two days to work only on Blender and CG.  Also, I have a photography class that will (hopefully) teach me something about composition.


So! That's about it for now.  I'm not going to include examples of my projects and other stuff for a little.  Sorry..

That's all for now.


Wednesday, January 21, 2015

T-Shirts and Other Programs

 Today, I created a design for a T-Shirt.  Inspired by shirts I just happened to see people wearing around, I decided to create my own! So, using three programs, Blender, Gimp, and Krita, I set out to create this monster.

I started with a bullet physics simulation, and did a smoke simulation to trail the bullet.


After that, I created a simple background using procedural textures and UV information.  No image texture, no nothing, and yet this picture is one of my favorite wallpapers ever.  Inspiration was pulled from a Muse album cover.

I then mixed the two together in Gimp, fixed the smoke, and added the Blenderfire logo.

After that, I moved to Krita, and painted all the advanced painting and fades and splatters you see.  The final image?


Sorry, but to give the picture credit I left it at full resolution.  Enjoy!

Saturday, January 10, 2015

Space Marines

So, after watching a host of Sci-Fi movies, I decided it was way past time to create my very own space marine.  So!  Seven hours and 2 million polys later, I pulled off my favorite render so far.  Unfortunately, I can't give you a picture, as blender estimates it will take a day or two to fully render out at the ridiculous resolution I'm doing for the first time:  2p.  No, not 4p, 2p.
Ahem.

So!  I took a couple screenshots, which take about 0 time to do, and can show you how the modeling turned out! (the way I got the snazzy green and brown look and the blue gloss look are due to something neat called MatCap which are basically realtime materials.)  Enjoy.


Thursday, December 25, 2014

Sculpting A Human Head: First Try

    So, because I thought it was about time, I went and did my first model of a human head.  With help from my trusty new Wacom tablet, I set out to create this guy.  I started with a simple box,

  Sculpted some, 


    Subdivided, and sculpted some more,


    At this point you can start to see features taking shape

    I refined many of the details and worked on minute things,


   Smoothed some of the issues and fixed some of the problems,

    And rendered it out.


   So, all in all, not too terrible of an attempt for my first sculpture!